If you’re not building with AI, are you even building these days? Sometimes, it seems not. AI has become such an integral part of workflows throughout many tools that a clear understanding of integrating it into your product and framework is critical.
Django is such a framework that powers thousands of products across the web: Instagram, Pinterest, and Mozilla are all services built on Django. Django provides a robust, flexible, and scalable foundation for web development, making it an ideal choice for integrating AI capabilities into your application. With its rich ecosystem of libraries and tools, Django streamlines the process of building AI-powered features, allowing developers to focus on creating innovative solutions.
So, let’s do just that.
Using Ollama for AI integration
Ollama library allows developers to incorporate AI capabilities into their Django applications. The difference with Ollama is:
1. It is set up to use open-source AI models, which give developers more control over the AI system and allow them to customize it to their specific needs. Open-source models also provide transparency and allow users to audit the model's behavior.
2. It is run locally, so data remains private and secure, as it is not sent to external servers. Running Ollama locally also reduces latency and dependency on internet connectivity, ensuring faster response times for AI-powered features.
Together, these make Ollama ideal for building and testing AI applications. You can easily develop and test locally before deploying your application and Ollama when you push your application live.
There are a few ways to get Ollama working locally. You can install the binaries for macOS, Windows, or Linux, or, as we’ll do here, use the Docker image:
docker pull ollama/ollama
We can then start the Ollama container and set it up with the necessary configurations:
docker run -d -v ollama:/root/.ollama -p 11434:11434 --name ollama ollama/ollama
Then, we can run the specific AI model inside the already running container:
docker exec -it ollama ollama run llama3
Here, we will use the latest Llama 3 model from Meta. This is one of the great benefits of Ollama and open source. Only a few days after release, we have access to one of the most potent current AI models locally.
That’s all that’s needed–we now have Llama 3 up and running and accessible on our local machine.
Building our Django Application
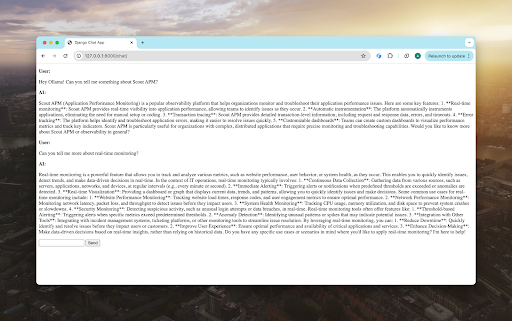
We’re going to build a chat app like ChatGPT or Claude. Only this one will use Django and run entirely locally.
You can find all the code for this application in this repo.
First, we need to build our bare-bones Django application. We’ll put it in a virtual environment for simple Python cleanliness:
python3 -m venv env

source env/bin/activate
Then, we’ll install the two libraries we need: Django and Ollama:
pip install django ollama
With Django installed, we can start a new Django project:
django-admin startproject ollamachat

cd ollamachat

python manage.py startapp chat
This code creates a new Django project called "ollamachat" and a new app called "chat" within that project.
With the basic structure of our Django project set up, we need to configure it to use the chat app. Open the settings.py file in the ollamachat directory and add 'chat' to the INSTALLED_APPS list:
INSTALLED_APPS = [
    'django.contrib.admin',
    'django.contrib.auth',
    'django.contrib.contenttypes',
    'django.contrib.sessions',
    'django.contrib.messages',
    'django.contrib.staticfiles',
    'chat',
]
Next, create the necessary views and templates for our chat application. Open the views.py file in the chat app directory and add the following code:
from django.shortcuts import render
from django.http import StreamingHttpResponse
from .ollama_api import generate_response
from django.views.decorators.csrf import csrf_exempt

# Create your views here.

@csrf_exempt
def chat_view(request):
   if request.method == "POST":
       user_input = request.POST["user_input"]
       prompt = f"User: {user_input}\nAI:"
       response = generate_response(prompt)
       #print(response['message']['content'])
       print(response)
       return StreamingHttpResponse(response, content_type='text/plain')
   return render(request, "chat.html")
This code defines a chat_view function that handles both GET and POST requests. When a POST request is received (i.e., when the user submits a message), it retrieves the user input from the request, passes it to the generate_response function to get the AI response, and returns the response as a streaming response.
We’ll also need to add this view to our urls.py for routing:
from django.contrib import admin
from django.urls import path
from chat.views import chat_view

urlpatterns = [
   path('chat/', chat_view, name='chat'),
]
Now, let's create the ollama_api.py file in the chat app directory to handle the interaction with the Ollama API:
import ollama

def generate_response(prompt):
    stream = ollama.chat(
        model='llama3',
        messages=[{'role': 'user', 'content': prompt}],
        stream=True,
    )
    for chunk in stream:
        yield chunk['message']['content']
This code imports the ollama library and defines a generate_response function. It uses the ollama.chat function to generate a response from the Llama 3 model based on the user's prompt. Notably, the response is returned as a stream of chunks so we can add it to the UI as it arrives.
Finally, let's create the chat.html template in the templates directory of the chat app:
<!DOCTYPE html>
<html>
 <head>
   <title>Django Chat App</title>
   <script src="https://code.jquery.com/jquery-3.6.0.min.js"></script>
   <script>
     $(document).ready(function () {
       $("#chat-form").submit(function (event) {
         event.preventDefault();
         var userInput = $("#user-input").val();
         $("#user-input").val("");
         $("#chat-history").append(
           "<p><strong>User:</strong></p><p>" + userInput + "</p>"
         );
         var aiResponseElement = $("<p>");
         $("#chat-history").append($("<strong>").text("AI:"));
         $("#chat-history").append(aiResponseElement);
         $.ajax({
           type: "POST",
           url: "/chat/",
           data: { user_input: userInput },
           xhrFields: {
             onprogress: function (xhr) {
               var response = xhr.target.responseText;
               console.log(xhr);
               console.log(response);
               aiResponseElement.html(function (i, oldHtml) {
                 return response;
               });
             },
           },
         });
       });
     });
   </script>
 </head>
 <body>
   <div id="chat-history"></div>
   <form id="chat-form">
     <input type="text" id="user-input" name="user_input" required />
     <button type="submit">Send</button>
   </form>
 </body>
</html>
When the "chat-form" is submitted, the submit event is triggered, and the associated event handler function is executed. The user input is retrieved from the "user-input" input field using jQuery's val() function. The user input is then appended to the "chat-history" div as two separate <p> elements: one for the "User:" label and another for the actual user input. This ensures that the user input is displayed on a new line.
A new <p> element (aiResponseElement) is created to hold the AI response. The "AI:" label is appended to the "chat-history" div as a separate element, followed by the aiResponseElement.
An AJAX request is sent to the server using the $.ajax() function. The user input is passed as data to the server using the data option.
The xhrFields option specifies the onprogress function, which is called whenever the server sends a partial response. Inside this function, the partial response is retrieved from xhr.target.responseText. The partial response is then set as the HTML content of the aiResponseElement using the html() function. This ensures the AI response is displayed and updated as the server sends more data.
When the user types a message and submits the form, the JavaScript code captures the user input, appends it to the chat history, and sends an AJAX request to the server. The server processes the request, generates the AI response using the Ollama API, and returns the response to the client.
As the server sends the response in chunks, the onprogress function is called, and the partial response is appended to the aiResponseElement. This allows the AI response to be displayed incrementally as received from the server.
With all the pieces in place, you can now run your Django application:
python manage.py runserver
Visit http://localhost:8000/chat/ in your web browser, and you should see the chat interface. You can now interact with the Llama 3 model by sending messages and receiving responses.

That's it! You've successfully built a Django chat application that integrates with the Ollama library and the Llama 3 model. What could we do next?
- Improve the styling. Add CSS styles, such as colors, fonts, and layout, to enhance the visual appearance of the chat interface. Implement responsive design and improve the overall aesthetics of the application to create a more engaging and user-friendly experience.
- Improve the response's latency. Reduce the latency between the user's input and the AI's response to optimize the application's performance. Explore techniques like caching, asynchronous processing, or faster hardware to minimize the delay and provide a more seamless interaction.
- Use other models or features of Ollama, such as multimodal AI. Expand the capabilities of the chat application by integrating other AI models or features offered by Ollama. Explore multimodal AI combining different modalities like text, images, and audio to create a more comprehensive and interactive user experience.
Unlocking the Potential of AI with Ollama and Django
Building AI-powered applications has become increasingly accessible and efficient with the advent of tools like Ollama and frameworks like Django. By combining these technologies' strengths, developers can easily create innovative and engaging AI experiences.
As AI continues to evolve and become more prevalent in various domains, tools like Ollama and frameworks like Django will play a crucial role in enabling developers to harness the power of AI and create cutting-edge applications. By embracing these technologies and exploring their potential, developers can push the boundaries of what's possible and deliver innovative solutions that transform how we interact with AI.


